Wednesday, 20 March 2013

How To Prevent Your Laptop From Overheating [Windows 7]

A few months back, I bought a new Core i3 laptop, hoping to run more resource intensive applications and games with better performance. While most of the applications seem to run without any issues, I have been dealing with a few thermal heating issues while playing games or running encoding tasks. For some odd reason, even reducing the affinity of the application or the game, does not eliminate the heating problem. I even bought a cooling pad, and tried switching to lower graphic options, but that, too, has resulted in minimum heat reduction. After going through many methods of reducing system heat up, it appears that there is only one true method that may be more effective than others  i.e., to reduce the maximum processor state from the laptop’s power settings. In this post, we will tell you how to prevent your system from heating up by adjusting the power options for your processor state.

This tip might come in handy not just for gamers and people who wish to run resource intensive application in the wake of overheating laptops, but also if, for some reason, you are unable to return a laptop with a heating issues (perhaps due to warranty constraints), or are dealing with an old laptop, which won’t take the brunt any more.
Before explaining the method of reducing the maximum processor state, let us take a look at the logic behind reducing the maximum processor state to prevent overheating of your laptop. Reducing the maximum processor state for your laptop (both when it is on battery or when the power cable is plugged in), reduces the processor’s performance a notch (depending on your settings) and prevents it from being used at optimum potential by an application or game, which will reduce thermal heating. For example, if you are playing a game that is consuming 100% of your processor’s capacity, then it may also result in heating up your system, whereas reducing the battery power state to, say 80%, can resolve this problem, and also result in battery power conservation.
To change these settings, go to Power Options from the Control Panel or the system tray menu.

Power options
Now go to Change Plan Settings –> Change Advanced Power Settings.


In the new window that pops-up, expand Processor Power management –> Maximum processor state, and reduce the on battery and plugged in power settings. The settings you keep will depend on your preferences and the capability of your system.
Based on our experience, we have noticed that that the laptop overheats when the processor is running at 100% processor state. Reducing the processor state by a few notches results in the reduction of temperate by 10-20 C, which results in a minor performance dip. We used Speccy to check for temperate during testing, based on which the processor running on 95% processor state gave the same performance (barely noticeable dip), with a drop of 10-20 C. You can keep an even lower processor state (such as 80-85%) to make sure that your laptop heats up even less.

The above mentioned tip should easily prevent your laptop from heating up; however, make sure that the processor state is not reduced very low in order to prevent reducing your processor’s performance to an undesirably low level.

Speccy – Advanced System Information Tool

Speccy is an advanced system information tool which gives ordinary users complete information about the system. It is developed by Piriform, the folks behind the popular CCleaner, Defraggler, and Recuva apps.
It is developed keeping advanced users and system administrators in mind, but can be used by common users too. Suppose you want to upgrade your RAM, Speccy will show you how many memory slots are there and how many are already installed so that you can go and buy the right type of RAM.
You can choose to view the detailed information of each part of the system from the left sidebar. They are Operating System, CPU, RAM, Motherboard, Graphics, Hard Drives, Optical Drives, and Audio. The Summary pretty much sums up everything that is installed in your system.

Speccy


Speccy RAM


Speccy Graphics


The unique part of this tool is that some information are displayed in real-time, such as, Bus Speed, DRAM Frequency, and Temperature, among many others.
Download Speccy
Even though it is in public beta, it has been tested to work on all versions of Windows, including the latest Windows 7. Both installer and portable version of the apps are available which work on both 32-bit and 64-bit OS. Enjoy!
Saturday, 16 March 2013

How to Get Facebook's New News Feed

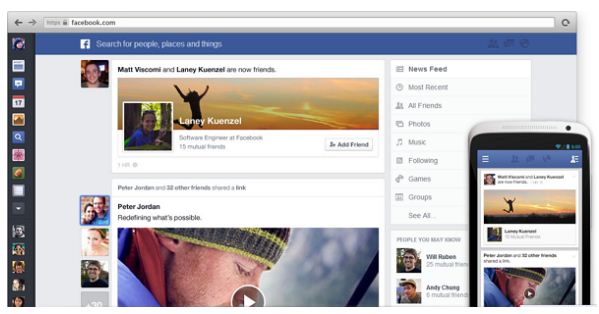
World's #1 social network Facebook has updated a new design on it's news feed. Facebook developer team regularly introduce new features to keep it's current place among social network sites. Now they have concentrated on Facebook news feed. Facebook news feed is turned into a new look, now you can focus on stories from your friends. Earlier, all the stories appeared in your news feed but now Facebook allows you to filter stories with following options.

How to Get Facebook's New News Feed

All Friends - a feed that shows you everything your friends are sharing.
Photos - a feed with nothing but photos from your friends and the Pages you like on Facebook.
Music - a feed with posts about the music you listen to music which your friends listen to.
Following - a feed with the latest news from the Pages you like and the people you follow.

Facebook shows the same view in whatever you log with like mobile devices, tablets and desktop versions with this useful new feature. All the Facebook users can get this new design in upcoming weeks. If you want to get this new feature soon on your Facebook account,then follow the given steps below.

How to get New News Feed?

Sign-in to your Facebook account.
Click here to go Facebook News Feed.
Now scroll down the windows to bottom.
After that, click on Join Waiting List button.

How to Get Facebook's New News Feed


That's all, Now you are in waiting list for get Facebook new news feed.

Download Facebook Touch for Windows 8

Windows 8 is one of the most expected product from Microsoft. It was released few month ago and running successfully on huge number of computers now. Recently Facebook touch app is updated for Windows 8 with some new features. Facebook touch app is designed as simple, fast and comprehensive.


Download Facebook Touch for Windows 8


You can have a touch optimized experience in your Windows 8 devices with this new updated Facebook touch app. This app consist some cool features. you can
access to your news feed, 
view user profiles, 
and you can chat with your Facebook friends with this app.

You can download the Facebook touch app for free of charge on Windows store. Facebook touch app supports on all builds of Windows 8.

Click here to Download facebook touch

Encrypt And Password Protect your Usb Drive Without Any Software

Hi Friends, Earlier back I posted How to Password protect your Usb Drive, But today i will Post iT in a more better and clear way.
 Bitlocker is Not much known technology By Windows Which helps you to Password protect and Encrypt Your Content in Usb Drives.


Just Follow the below simple Steps :

Step 1 : Insert Pendrive which you want to password Protect.

Step 2: Open explorer and Right click on your Removable drive and Select "Turn OnBitlocker"


Step 3: After you click on Turn On bitlocker, Wizard will be open, Check "Use a password to Unlock the Drive"

Step 4 : Now type In the Password you want and Click Next.

Step 5: Now you will be asked "How Do You want to back up Recovery Keys " Choose From the options 


Step 6 : You then have to choose whether your drive is already in use or if it is new. Then click next.


Step 7 : Choose how much Of Your Drive to Encrypt, Entire drive or Just Used Disk Space.


Step 8 : Atlast Click on Start Encrypting, Encrypting Process Will start.

Now Whenever you Want to use it, plugin the encrypted Drive in you Computer it will give you a notificationWith it is Bitlocker Protected, You have to just click on it,  Enter your password and click on Unlock Button.

Thats it,

Keep your Content in pendrive Protected with this trick. I tried my best to Keep the Tutorial Simple.
Keep visiting, keep Learning.


How To Hack saved passwords on Chrome


Hey Guys,  Today i will provide you an awesome trick to hack saved password on Google chrome.
this is an awesome trick, You might have experienced when you login to any site say Facebook, Google asks you to save your password,
Ever wondered where this password is saved in Chrome, no ?
Dont worry, today we will learn it very easily.
In just 3 simple steps we will learn how to hack passwords on google chrome.
If you know that you brother or friend saves his password in chrome and you want to know his password, then this trick will definately help you out.

Lets check it.

Step :1
First of all Open Google Chrome, the you will find Google menu at the top right corner. click it.

Step :2
Now Click on setting at the bottom, a new tab will open, Scroll down and click on Show Advance Setting. There you will find Passwords and Forms,
Refer the below picture and as shown there click on  Manage Saved Password.


Step :3

Now we are almost done. after click on Manage Saved Passwords  you will get the lists of saved password, Only thing you have to do is click on Any saved password and then click on Show,
Thats it.  you will get the password.

 I believe you enjoyed this trick, Pls make use of social plugins, share it , tweet it, Recommend this.
Thank you :)

Change Google Logo with your Name

Hi Freinds Today we will see a nice small but awesome trick To Change Google with your own name or any other name and search.
As we know When we open www.google.com, it shows Google, But how cool it will be if it shows your Customized name instead of Google.


Its time to act Cool and Show your Friends about this trick. Its very simple but Effective.

Replacing google with your Name.

Your Can Follow Any of the below sites To change google logo to your name ..

One of my Favourite is Funnylogo


What you have to do is just open the site and Enter the name which you want to display,
Choose the style and Click on Create my Search Engine.

In my case I Entered Tech Walk With HRK and this is how it looked.


Isn't This cool ?

You can Set It as Your Home page too.


Try these sites too.


Thats it, Enjoy, :)
Friday, 15 March 2013

How Do You Backup App or Game Data on Windows 8

How Do You Backup App or Game Data on Windows 8 Then?

A new Windows 8 Apps Data Backup tool lets users easily create backup of the important data presented in the app. Similarly, you can also restore the data. There might be some instances where you’d want to even transfer the data to the new system. In such case, this tool comes in very handy. There are no complex settings to get used to. All you are supposed to do is select the apps from the list and click Backup or Restore button. The rest will be handled by the application itself.
windows 8 data backup tool
This application is powerful enough to take a backup of your settings, game progress and game points. No longer would you require to fear the loss of data due to reinstallation or migration. The app is very small and can be used as a portable application (188KB only). You can also transfer or restore that data or Surface tablet, provided the apps are supported and you have them installed already.

How to Use Apps Data Backup Tool?

Simply, download the application from here.
Backup: Let’s take a scenario 1 where you want to backup your app data. In order to perform the operation, you need to close any of the running instances of the applications. Make sure you’ve closed all the apps which you are going to backup using this tool.
close all windows 8 apps
backup options
save windows 8 apps data backup
Run the above application. Click either on backup or restore button to populate the list of all installed Windows 8 apps. It will show you the screen as shown below. Select the appropriate applications from the populated list. Just click on Windows 8 apps that you’d want to take a backup of. Windows 8 Apps Data Backup tool also shows the default Bing apps, Zune data, WinStore and Xbox Live games.
It will also ask you whether you want to save the data in zip format or not.
Restore: Restore process is also very similar to that of backup process. Just click on the restore option at the top middle of the application and you’re good to go. Navigate through the previously saved Windows 8 apps data backup and restore it from there. Make sure that you have installed all those Windows 8 apps and games on your system before restoring them.
restore w8 apps data
restore apps or games data
restore windows 8 data complete
The process was darn easy, wasn’t it? Hopefully, you’ve learn to backup and restore Windows 8 apps data using the aforementioned tool. You can also transfer those backup zip files to USB and use it on other systems. Do let us know if you’ve trouble in using this application.

How To Enable Hibernate Mode in Windows 8

Enable Hibernate Mode in Windows 8

The bottom right hand hot corner presents power settings. If you do not see the hibernate option there, then it probably means that it is disabled or not active. Following steps should be performed to enable hibernate option in W8.
First thing first, you need to edit registry to see whether the Hibernate option has been disabled by default or not. In order to do that, you should navigate to following path
HKEY_LOCAL_MACHINE\SYSTEM\CurrentControlSet\Control\Power
Note: Always backup registry before you perform any task. It could make or break your device. Having a backup in the handy place will always help in rollback any changes (read mess) you made.
Step 1: Press WinKey + R to open run command.
regedit run command
Step 2: Type regedit and press enter button.
Step 3: This will open a registry editor module in the separate window. Now navigate to the below path.
HKEY_LOCAL_MACHINE\SYSTEM\CurrentControlSet\Control\Power
Step 4: As displayed in the right hand pane (check below screenshot), look for the option called HibernateEnabled. If the value of this registry entry is 0, then it means it is disabled. You should right click and modify the entry to 1. This will enable hibernate mode in Windows 8.
enable hibernate through registry
Step 5: One again, check the power option from the bottom right hot corner. If you still aren’t finding Hibernate option, then perform the following steps.
Step 6: In case, if the hibernate option is not present, it indicates that you need to change power settings.
Step 7: Go to Control panel –> Hardware and Sound –> Power Options. You will find something similar to this.
power options
Step 8: Select a ‘Choose what the power buttons do’ from the left hand menu option. It should bring something like this.
change power settings
Step 9: You will find blurred out option. In order to enable them click on ‘Change settings that are currently unavailable‘ option as highlighted in the screenshot.
Step 10: Now from there, select the Hibernate option. Save the changes. It should bring the Hibernate option in the power button as shown below. There is no need to restart for this operation to perform.
enable hibernate option
hibernate option enabled
Isn’t it a piece of cake? Have you lost us somewhere in between or have you any trouble understanding the steps above? Let us know, so we can help you out to enable Hibernate option on Windows 8.
Tuesday, 12 March 2013

How to Reset Your Forgotten Password In Windows.

Guys Today we will Learn How to Reset your Forgotten Password In Windows. Often People Tend To Forget their Password of Their Windows Password.

Forgetting any passoword is not fun, but luckily Here is the simple trick which i will show you to Reset yourForgotten Password.

REQUIREMENTS :
1. Windows Installation Disk.
2. A simple Command Line.

Follow Below Simple Steps :

Step 1: Insert Your windows disk And Boot Your Pc.

Step 2:  Select " Repair Your Computer " From the lover Left Corner. Check the below Pic.

How to Reset Your Forgotten Password In Windows.

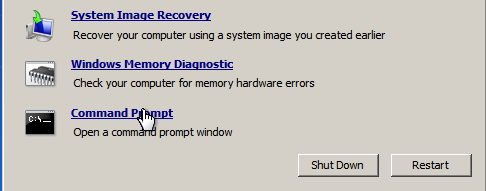
Step 3: Follow on Till you get the below screen , You need to click on Command Promt.

How to Reset Your Forgotten Password In Windows.

Step 4: Now The Real Trick,Type The below Command to backup the original Sticky keys File. 
copy c:\windows\system32\sethc.exe c:\


Step 5: Now Copy The Command Prompt Executable on top of the sticky keys executable :


copy c:\windows\system32\cmd.exe c:\windows\system32\sethc.exe


Follow The below Pic For More Idea on It.

How to Reset Your Forgotten Password In Windows.


Step 6: Now Reboot Your PC.

Step 7: After Rebooting your pc, You will see a login Screen, All You need to do is Hit Shift Key 5 Times, You will get a Command Promt.

Step 8 : Now to Reset Your Password just replace The Username and passoword with your own In Below line.

net user  MyNewPassword


Thats all Now you can Login.

you probably want to put the original sethc.exe file Back, Then You have to just reboot into the installationCD, Open the Command Promt Again and Copy The 
c:\sethc.exe file back to 

c:\windows\system32\sethc.exe.


Enjoy, Keep Learning.
 
Toggle Footer