 “Rooting”
your Android phone might sound like rocket science; however, it is not
an impossible feat. You can root your Android phone in a matter of
minutes.
“Rooting”
your Android phone might sound like rocket science; however, it is not
an impossible feat. You can root your Android phone in a matter of
minutes.
Why would you root your device in the first place? To get complete access to the whole system and launch apps that need root permissions. Running these apps means you can disable boatware, manage apps permissions, make tethering possible with a lot of other things that you might not be able to do otherwise.
What is Android Rooting?
Linux users
can relate to Android more since it is created on the same basis. Root
user on Linux and UNIX-based OS is just like the Administrator mode in Windows. You can not only access your operating system but also make changes you want as a root user. However, on your Android deviceyou do not have root access. Consequently, some of the Apps wouldn’t work without this access.
If you gain
root access, you will be able to disable boatware as mentioned before,
refuse app permissions yourself, launch a firewall, enable tethering,
access the whole file system and also run those apps that needed root
permission in Android Market (Google Play store) which did not perform without root access on your phone.
You don’t have to perform rooting unless you want to run Apps that need root permissions.
Important
Keep a few of these things in mind before you decide to root your Android device:
Warranty – Rooting voids your warranty of the device in most cases but no damage to the hardware is done. Since you can always “unroot” your device at anytime therefore, the manufacturer cannot tell if the device had been rooted before.
Security – If you are using Google Wallet for
NFC payments, you might want to consider rooting again since the App
becomes vulnerable on rooted devices allowing certain Apps to gain
access to your PIN and wallet details. Google Wallet will show a warning message if used on a rooted device.
Space
Bricking –
“Rooting” is a safe procedure to be applied on your device that can
leave your device totally unusable or the least usable like a “brick” if
you try to go out of the parameters and work around the procedure. If
you try rooting an Operating system not supported by a tool, then too,
you run the risk of breaking the
device. For any sort of rooting, jailbreaking, or installing custom
ROMs you should first do some research whether the feat performed well
with people owning the same device.
Setup
Before performing the actual rooting process, you need to do some things before:
First download and install the services Java JDK and Android SDK on your computer in the same order as mentioned i.e. install Java before the Android SDK.
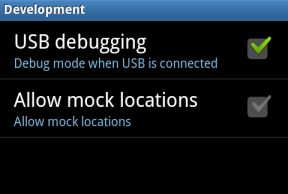
Next enable the USB debugging feature on your Android device. On the screen go to Settings thenApplications followed by Development and finally enable the check box for USB debugging.
Use
the USB cable to connect your Android device to the computer without
mounting the SD card on the computer. Simply plug the device in.
For
this to work, you need to have USB drivers installed on your device.
The required drivers are automatically detected and installed by SuperOneClick, in case if that does not work you must visit the device manufacturer’s website and download these drivers manually.
SuperOneClick
SuperOneClick
performs rooting requiring you to click just once and the process is
initiated. The root performed is compatible with many devices and works
for almost everyone. You may visit Android Development and Hacking forums at XDA Developers if
your Android does not support SuperOneClick. You will find subforums at
the site for you device. All you need is to type in the name of your
device and you will see the information posted by other people that have
the same device rooted using some other tool. You can use this information for your device as well.
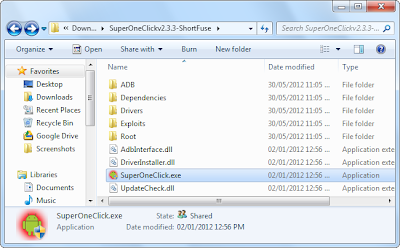
To download SuperOneClick, you can look for the links at its official site shortfuse.org. Once downloaded, launch the SuperOneClick.exe application.
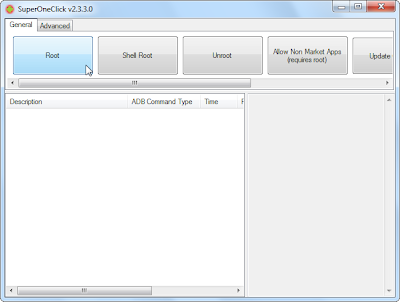
When
the .exe application is launched, you will see the Root option in
SuperOneClick window. Click on it and you are as good as done with the
process.
The
process should be complete in some minutes. In case of any error or
problem, you can check it on the XDA Developers forum as mentioned
earlier or go for a Google search on the error.
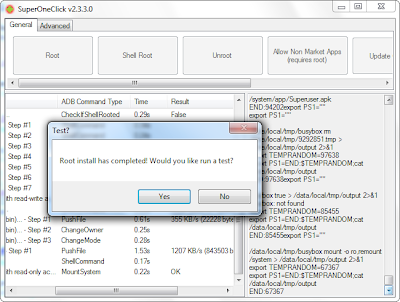
When rooting is done, restart your Android device before proceeding to use it.
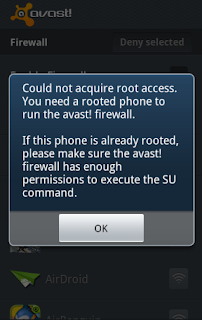
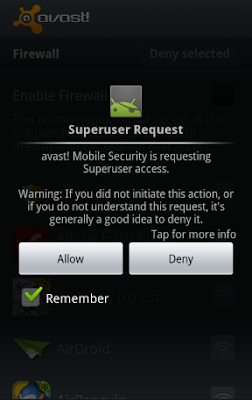
Superuser
SuperOneClick utility has default settings to install SuperUser binary that is available from Google Play as well. This allows you to manually deny or permit any app that tries to acquire root permissions via su command.
After
successfully rooting your device, you are free to run Apps that require
root access for successfully functioning on your device.
0 comments:
Post a Comment